Set up Wireguard® VPN on Unraid
October 9, 2021Wireguard is the new player in the VPN scene, fast and efficient. With the Dynamix WireGuard plugin you can quickly set up different types of VPN connections. For example, you can use your own Unraid server as a VPN endpoint.
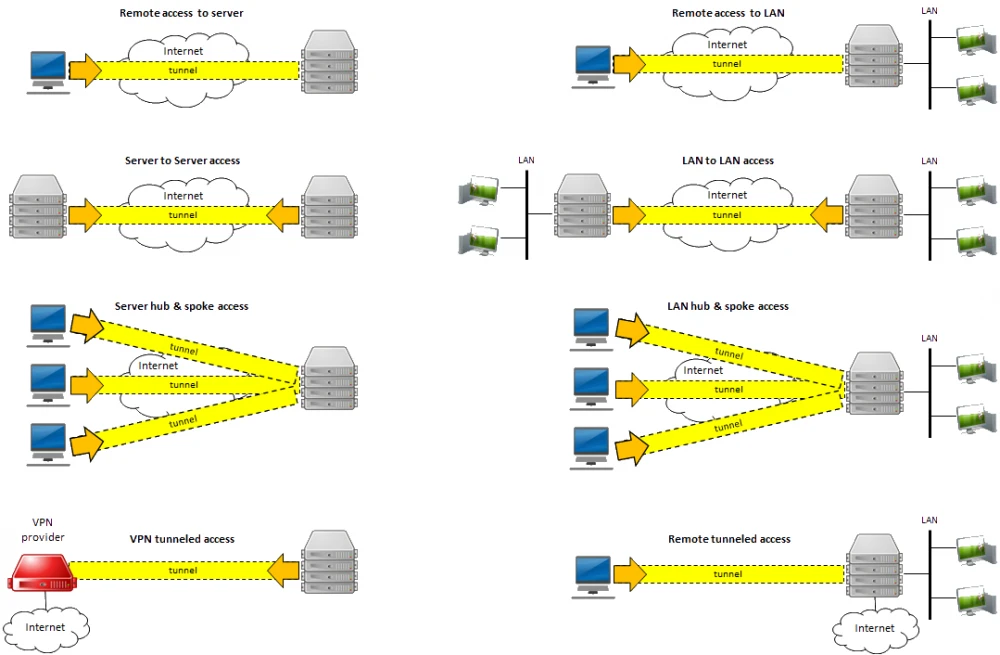
- Remote access to server: Use your phone or computer to remotely access your Unraid server, including:
- Unraid administration via the webgui.
- Access to Docker, VMs, and network shares as if you were physically connected to the network
- Remote access to LAN: Builds on “remote access to server” and allows you to access your entire LAN as well.
- Server to server access: Allows two Unraid servers to connect to each other.
- LAN to LAN access: Builds on “server to server access” and allows communication between two entire networks. (see this guide)
- Server hub & spoke access: Builds on “remote access to servers”, with the difference that all VPN clients can also connect to each other. Note that all traffic goes through the server.
- LAN hub & spoke access: Builds on “Server hub & spoke access”, with the difference that you can also access your entire LAN.
- VPN tunneled access: Route traffic for specific Docker and VMs through a commercial WireGuard VPN provider (see this guide).
- Remote tunneled access: Securely access the Internet from untrusted networks by routing all your traffic through the VPN and over Unraid’s Internet connection
Most people will be interested in “Remote access to server” and “Remote tunneled access”. So an option to remotely manage its Unraid server and the option to channel all traffic through the VPN. So you can e.g. access German Netflix content in Germany.
Requirements
- Unraid 6.8+ with the Dynamix WireGuard plugin from Community Application Plugin.
- Realize that giving VPN access to your LAN is just like giving someone physical access to your LAN, except that they have it 24/7 when you’re not there to monitor it. Only give access to people and devices you trust, and make sure configuration details (especially private keys) are not shared insecurely. Regardless of the “connection type” you choose, you should assume that anyone who gains access to this configuration information can also gain full access to your network.
- Unraid automatically configures your WireGuard clients to connect to Unraid using your current public IP address, which will work until that IP address changes. To future-proof the setup, you can use Dynamic DNS instead. Learn how to set up an appropriate connection with DuckDNS here.
- If your router has UPnP enabled, Unraid can automatically forward the port for you. If not, you need to know how to configure your router to forward a port.
- You will need to install WireGuard on a client system. It is available for many operating systems:
- https://www.wireguard.com/install/
- Android or iOS are good first systems, as you can get all the details via QR code.
Setting up the Unraid side of the VPN tunnel
- First go to Settings -> Network Settings -> Interface eth0. If “Enable bridging” is set to “Yes”, then WireGuard will work as described below.
- If UPnP is enabled on your router and you want to use it in Unraid, go to Settings -> Management Access and confirm that “Use UPnP” is set to Yes
- In Unraid 6.8 go to Settings -> VPN Manager
- Give the VPN tunnel a name, such as “MyHome VPN”.
- Press “Generate Key Pair.” This will generate a set of public and private keys for Unraid. Be careful not to accidentally share the private key (e.g. in a screenshot like this).
- By default, the local endpoint is configured with your current public IP address. If you have previously chosen to set up DDNS, change the IP address to the DDNS address.
- Unraid recommends a port to use. Typically, you do not need to change this unless you already have WireGuard running elsewhere on your network.
- Click Apply.
Related posts:
 The Appstore for Unraid: Install community applications plugin
 Install Minecraft Server on Unraid
 Install Unraid
 DuckDNS Create free subdomain on Unraid
 Build a Unraid Server
 Installing a MacOS VM on Unraid – Virtualized Mac
 Install Mozilla Webthings Gateway at Unraid
 Unraid Hardware Requirements
 Mount USB hard disks in Unraid
 Install ARK: Survival Evloved Server on Unraid
 Nextcloud install on Unraid
 Mine Chia at Unraid
 Install Seafile Server on WD My Cloud Home
 Internet censorship: Project Golden Shield and what America is up to
 Ubuntu Server NginxProxyManager Docker install
 Does Unraid need a graphics card (GPU)?