
Install Minecraft Server on Unraid
September 20, 2021When the Potente Unraid server is finally in the house, the first game server should also be installed. After all, you should really have fun with the server. In this case, a universal Minecraft server is installed as Docker from the community applications. On the server, with a few (manual) steps, the standard version but also Spigot and Forge or modpacks such as Feed the Beast can be installed.
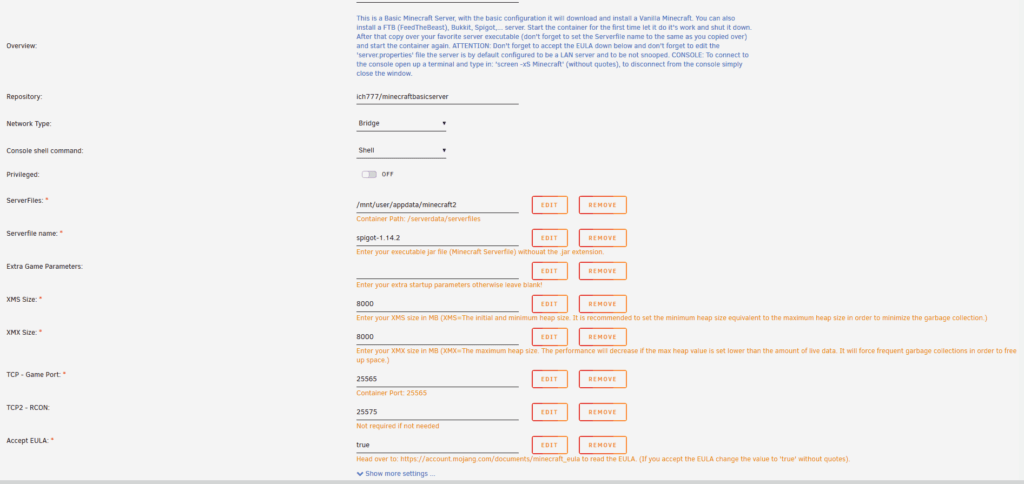
MinecraftBasicServer
The MinecraftBasicServer can be found in the CA (Community Aplications) and is maintained by the user Ich777. With a click on “install” the Docker container is already downloaded. In the settings, the path to the data storage and the name of the server file can be changed. In the field for the server name, simply enter the name of the server file without the .jar extension, this must be done so that the server knows what to do. By default, the latest Minecraft version is installed. After each change, the container should be restarted to reload the settings.
To install FTB Server simply download the server files. Then the InstallFTB.bat should be executed. When the console window closes again the files have to be copied into the directory of the docker. This can be done with a FTP client like FileZilla. In FileZilla you can simply log in with your Unraid username and password.
Port enable
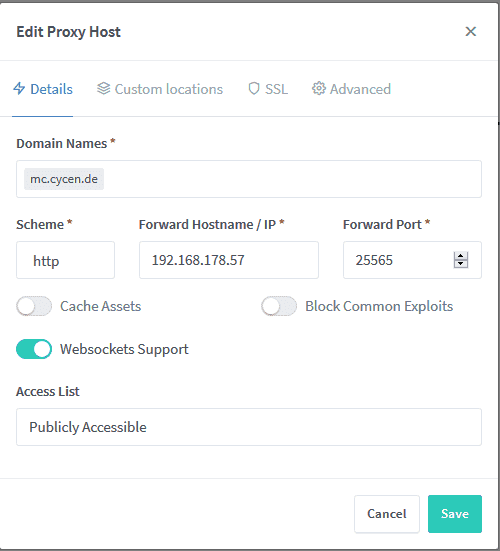
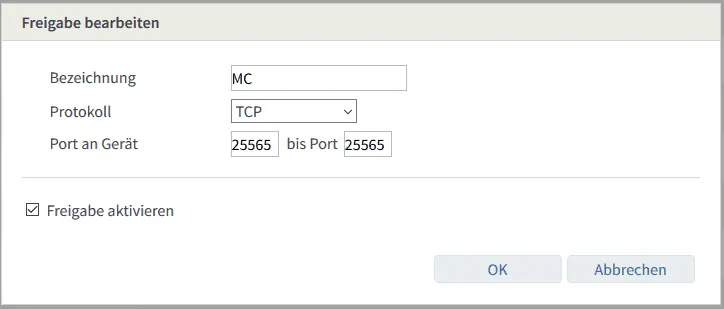
If you want to use the server from the outside, the corresponding port must be released in the firewall / router. In the case that the port remains unchanged in the settings: 25565 If the release is set up, the Minecraft server can already be accessed via the Ip with attached port. If you only want to use the IP, it makes sense to use a Static IP (only available for business contracts) or you should use a DynDNS provider like DuckDNS. For a DynDNS tutorial just click here. For the forwarding to the server the NginxProxyManager is used. This container is downloaded again via the CA. After changing the password in the webinterface you can also create a corresponding proxy host. An example can be seen below.
Related posts:
 Install ARK: Survival Evloved Server on Unraid
 The Appstore for Unraid: Install community applications plugin
 Ubuntu Server NginxProxyManager Docker install
 Install Docker Engine on Ubuntu
 Unraid vs Freenas
 Install Unraid
 DuckDNS Create free subdomain on Unraid
 Making Docker Containers Available over the Internet with Nginx Proxy Manager
 Install Seafile Server on WD My Cloud Home
 Does Unraid need a graphics card (GPU)?
 Runs under WSL: First Linux malware appeared in Windows
 Nextcloud install on Unraid
 FreeBSD: Netflix streams at almost 400 GBit/s per server
 Raspberry Pi gets $45 million investment
 Report: Open Source Libraries Hardly Updated in Companies
 Binary optimizer: Facebook’s Bolt significantly speeds up the Linux kernel